Mar 23, 2017
Jan 6, 2017
.vimrc 설정방법 공유
.vimrc 파일 내용
"===== Vundle =====
set nocompatible " be iMproved, required
filetype off " required
" set the runtime path to include Vundle and initialize
set rtp+=~/.vim/bundle/Vundle.vim
call vundle#begin()
" alternatively, pass a path where Vundle should install plugins
"call vundle#begin('~/some/path/here')
" let Vundle manage Vundle, required
Plugin 'VundleVim/Vundle.vim'
" The following are examples of different formats supported.
" Keep Plugin commands between vundle#begin/end.
" 여기에 원하는 플러그인 삽입
" NERD Tree
Plugin 'scrooloose/nerdtree'
" NERD Tree Git Plugin
Plugin 'Xuyuanp/nerdtree-git-plugin'
" All of your Plugins must be added before the following line
call vundle#end() " required
"filetype plugin indent on " required
" To ignore plugin indent changes, instead use:
filetype plugin on
"
" Brief help
" :PluginList - lists configured plugins
" :PluginInstall - installs plugins; append `!` to update or just :PluginUpdate
" :PluginSearch foo - searches for foo; append `!` to refresh local cache
" :PluginClean - confirms removal of unused plugins; append `!` to auto-approve removal
"
" see :h vundle for more details or wiki for FAQ
" Put your non-Plugin stuff after this line
"
"
"===== Basic Variables =====
"syntax on " Enables Vim to show parts
" of the text in another font or color
colorscheme vibrantink
"set lines=50 columns=120 " 창 크기 설정
set fencs=utf-8,euc-kr,cp949,cp932,big5,latin1,urs-2le,shift-jis,euc-jp
"set fileencoding=utf-8
set ls=2 " 작업표시줄 항상 표시
set nu " display line numbers on the left
set ts=4 " tab space
set sw=4 " Shift Width
set ruler " display the cursor position on the last line of the screen
set nobackup " no backup
set backspace=eol,start,indent " 백스페이스 사용하면 이전줄과 연결됨
set autoindent " automatically indent
set cindent " automatically indent in C files.
set smartindent " smart indent
set ic " 검색 시 대소문자 구별 안함
set nows " 검색 시 파일 끝에서 처음으로 되돌리기 안함
set hls " 검색어 강조
"===== 버퍼간 파일 이동 =====
map ,1 :b!1<cr>
map ,2 :b!2<cr>
map ,3 :b!3<cr>
map ,4 :b!4<cr>
map ,5 :b!5<cr>
map ,6 :b!6<cr>
map ,7 :b!7<cr>
map ,8 :b!8<cr>
map ,9 :b!9<cr>
map ,0 :b!0<cr>
map ,w :bw<cr> " remove current bufferfile
"======== KEY MAPPING ========
map <f1> K
map <f2> <c-w>w
map <f3> gg=G
"map <f4> :cn<cr> " :cw -> window showing the locaion list for the current window.
"map <f5> :!./%<
"map <f6> :!clear<cr>:w<cr>:make<cr>
"map <f7> :!clear<cr>:w<cr>:!gcc -W -Wall % -o %<<cr>
"au BufWinEnter *.java
"\ map <f5> :!java %<
"au BufWinEnter *.java,*.cpp,*.c
"\ map <f7> I//<esc>
"au BufWinEnter *.java,*.cpp,*.c
"\ map <f8> ^xx
"map <f9> :!ctags -R<cr>
"au BufWinEnter *.cpp
"\ map <f9> :!ctags -R --c++-kinds=+p --fields=+iaS --extra=+q .<cr>
"map <f10> <c-> " 태그 검색
"map <f11> <c-t> " 태그 복귀
map <f12>1 :NERDTree<cr>
"map <f12>2 :TlistToggle<cr>
map <f12>3 gg=G
map ,m :new Makefile<cr>:/PROGS<cr>ww
map <pageup> <c-b>
map <pagedown> <c-f>
"저장
"map <c-s> :w<cr>
"복사
"map <c-c> :'a,'b w! ~/tmp/tmp<cr>
"붙여넣기
"map <c-p> :r ~/tmp/tmp<cr>

NERD Tree 개발버전, NERD Tree git plugin 을 Vundle로 설치
NERD Tree 란 아래 그림과 같이 vim에서 파일시스템을 탐색하고 파일을 열 수 있도록 도와주는 플러그인이다.
http://www.vim.org/scripts/script.php?script_id=1658
 |
| https://www.flickr.com/photos/30496122@N07/2862367534/sizes/o/ |
nerd tree git plugin은 vim 에서 git 저장소의 상태확인을 위해 쓴다.
 |
| https://camo.githubusercontent.com/3fe0388df11cb787f36e1fa108398fd3f757eef4/687474703a2f2f692e696d6775722e636f6d2f6a534377476a552e6769663f31 |
1. 설치방법
vimrc를 열어 vundle 플러그인 삽입란에 아래 2라인을 추가한다.
Plugin 'scrooloose/nerdtree'
Plugin 'Xuyuanp/nerdtree-git-plugin'
 |
| <플러그인이 추가된 모습> |
저장 후 vim 에서 :PluginInstall 입력

설치완료.
.vim .vimrc 작업1 - Vundle 설치
Vundle 은 Vim 플러그인 관리 도구이다.
https://github.com/VundleVim/Vundle.vim
html 이라는 플러그인을 설치할려고 할때
오리지날 vim 플러그인 시스템은
vim/
syntax/
html.vim
indent/
html.vim
이런식으로 저장되는데
Vundle은
vim/bundle/
html/
syntax/
html.vim
indent/
html.vim
이렇게 저장된다.
Vundle의 장점은 html 플러그인을 bundle로서 관리하여 해당 플러그인의 모든 파일을 알맞은 디렉토리에 저장하고 관리하기 편하게 도와준다.
설치하기 앞서 git 이 설치되어있어야한다. git은 sudo apt-get install git 로 설치하면 된다.
1. Vundle Clone
jkpark@cactus:~$ git clone https://github.com/VundleVim/Vundle.vim.git ~/.vim/bundle/Vundle.vim
2. vimrc 기본 설정
아래 내용을 .vimrc 파일의 제일 윗줄에 추가한다.
* 설치와 테스트를 위해 NERD Tree 플러그인을 설치할 것이다.
3. 플러그인 검색 및 설치
플러그인 검색 방법은 vimrc파일을 열어 :BundleSearch 를 입력하면 플러그인 리스트가 출력된다.

원하는 플러그인은 http://vim-scripts.org/vim/scripts.html 에서 찾을 수 있다.
원하는 플러그인을 찾은다음, 해당 이름을 검색하고

4. 인스톨
vim 을 열고 :PluginInstall 을 입력한 후 엔터
5. 확인
.vim/bundle 에서 설치된 플러그인이 존재하는지 확인한다.
jkpark@cactus:~/.vim/bundle$ ls -al
합계 20
drwxrwxr-x 5 jkpark jkpark 4096 1월 6 14:41 .
drwxrwxr-x 3 jkpark jkpark 4096 1월 6 14:27 ..
drwxrwxr-x 8 jkpark jkpark 4096 1월 6 14:27 Vundle.vim
drwxrwxr-x 9 jkpark jkpark 4096 1월 6 14:41 nerdtree
jkpark@cactus:~/.vim/bundle$
또한 vim 에서 :NERDTree 를 입력후 엔터치면 아래 그림과 같이 NERDTree가 실행된다.

https://github.com/VundleVim/Vundle.vim
html 이라는 플러그인을 설치할려고 할때
오리지날 vim 플러그인 시스템은
vim/
syntax/
html.vim
indent/
html.vim
이런식으로 저장되는데
Vundle은
vim/bundle/
html/
syntax/
html.vim
indent/
html.vim
이렇게 저장된다.
Vundle의 장점은 html 플러그인을 bundle로서 관리하여 해당 플러그인의 모든 파일을 알맞은 디렉토리에 저장하고 관리하기 편하게 도와준다.
설치하기 앞서 git 이 설치되어있어야한다. git은 sudo apt-get install git 로 설치하면 된다.
1. Vundle Clone
jkpark@cactus:~$ git clone https://github.com/VundleVim/Vundle.vim.git ~/.vim/bundle/Vundle.vim
2. vimrc 기본 설정
아래 내용을 .vimrc 파일의 제일 윗줄에 추가한다.
* 설치와 테스트를 위해 NERD Tree 플러그인을 설치할 것이다.
"===== Vundle =====
set nocompatible " be iMproved, required
filetype off " required
" set the runtime path to include Vundle and initialize
set rtp+=~/.vim/bundle/Vundle.vim
call vundle#begin()
" alternatively, pass a path where Vundle should install plugins
"call vundle#begin('~/some/path/here')
" let Vundle manage Vundle, required
Plugin 'VundleVim/Vundle.vim'
" The following are examples of different formats supported.
" Keep Plugin commands between vundle#begin/end.
" 여기에 원하는 플러그인 삽입
" All of your Plugins must be added before the following line
call vundle#end() " required
filetype plugin indent on " required
" To ignore plugin indent changes, instead use:
"filetype plugin in
"
" Brief help
" :PluginList - lists configured plugins
" :PluginInstall - installs plugins; append `!` to update or just :PluginUpdate
" :PluginSearch foo - searches for foo; append `!` to refresh local cache
" :PluginClean - confirms removal of unused plugins; append `!` to auto-approve removal
"
" see :h vundle for more details or wiki for FAQ
" Put your non-Plugin stuff after this line
3. 플러그인 검색 및 설치
플러그인 검색 방법은 vimrc파일을 열어 :BundleSearch 를 입력하면 플러그인 리스트가 출력된다.

원하는 플러그인은 http://vim-scripts.org/vim/scripts.html 에서 찾을 수 있다.
원하는 플러그인을 찾은다음, 해당 이름을 검색하고
Shift+V 라인 선택하면 아래와 같이 붙여넣기가 된다.
Y키로 복사
Ctrl+W ->w 로 창 이동
P로 붙여넣기

4. 인스톨
vim 을 열고 :PluginInstall 을 입력한 후 엔터
5. 확인
.vim/bundle 에서 설치된 플러그인이 존재하는지 확인한다.
jkpark@cactus:~/.vim/bundle$ ls -al
합계 20
drwxrwxr-x 5 jkpark jkpark 4096 1월 6 14:41 .
drwxrwxr-x 3 jkpark jkpark 4096 1월 6 14:27 ..
drwxrwxr-x 8 jkpark jkpark 4096 1월 6 14:27 Vundle.vim
drwxrwxr-x 9 jkpark jkpark 4096 1월 6 14:41 nerdtree
jkpark@cactus:~/.vim/bundle$
또한 vim 에서 :NERDTree 를 입력후 엔터치면 아래 그림과 같이 NERDTree가 실행된다.

Dec 29, 2016
토렌트 다운로드 완료 후 토렌트 리스트 자동삭제
토렌트 다운로드 후 토렌트 리스트에서 제거하는 방법
*아래 파일을 아무리 수정해도 데몬을 재시작하면 파일이 수정 전으로 돌아간다. 이 문제때문에 한시간을 소비해서 찾은 답은.. 간단했다.
파일 수정하기 전에 데몬은 stop하고 수정하면 된다.
jkpark@cactus:/storages/storage1/public/torrent$ sudo service transmission-daemon stop
꼭 데몬은 stop한 후 아래 작업을 수행한다.
/etc/transmission-daemon/settings.json 파일을 열어 다음과 같이 수정한다.
"script-torrent-done-enabled": true,
"script-torrent-done-filename": "/storages/storage1/public/torrent/auto_delete.sh",
/storages/storage1/public/torrent/auto_delete.sh 파일을 만들고 아래 내용을 입력한다.
#!/bin/sh
# Transmission script to remove torrent from lists
# The file for logging events from this script
LOGFILE=/storages/storage1/public/torrent/auto_delete_log
# Remote login details.
TR_HOST="9091 --auth=아이디:비밀번호"
echo "`date '+%Y-%m-%d %H:%M:%S'` removed from list : $TR_TORRENT_NAME" >> $LOGFILE
transmission-remote $TR_HOST -t $TR_TORRENT_ID --remove
저장 후 권한설정
jkpark@cactus:/storages/storage1/public/torrent$ chmod 777 auto_delete.sh
jkpark@cactus:/storages/storage1/public/torrent$ sudo chown debian-transmission:debian-transmission auto_delete.sh
데몬 시작
jkpark@cactus:/storages/storage1/public/torrent$ sudo service transmission-daemon start
다운로드가 완료되면 리스트에서 토렌트가 제거되고 다음과 같이 로그가 남는다.
jkpark@cactus:/storages/storage1/public/torrent$ cat auto_delete_log
2016-12-29 22:05:48 removed from list : 제거된토렌트명
jkpark@cactus:/storages/storage1/public/torrent$
jkpark@cactus:/storages/storage1/public/torrent$ cat auto_delete_log
2016-12-29 22:05:48 removed from list : 제거된토렌트명
jkpark@cactus:/storages/storage1/public/torrent$
토렌트 서버 구축 (Transmission-daemon)
1. 다운로드 디렉토리 생성
downloads, incomplete 디렉토리 생성
jkpark@cactus:/storages/storage1/public/torrent$ ls -al
합계 16
drwxrwxr-x 4 jkpark jkpark 4096 10월 29 01:26 .
drwxrwxrwx 13 nobody nogroup 4096 12월 28 21:43 ..
drwxrwxrwx 12 jkpark jkpark 4096 12월 28 12:51 downloads
drwxrwxrwx 2 jkpark jkpark 4096 10월 29 01:26 incomplete
jkpark@cactus:/storages/storage1/public/torrent$
원래 목적은 incomplete 디렉토리에 토렌트용 HDD를 마운트하고 이 위치에 다운로드해서 저장소의 부담을 줄이고 싶었지만 토렌트용 HDD가 고장났는지 인식이 안된다..
그러므로 다운로드를 downloads 디렉토리에 하도록 설정한다.
jkpark@cactus:/storages/storage1/public/torrent$ sudo apt-get install transmission-daemon
[sudo] password for jkpark:
패키지 목록을 읽는 중입니다... 완료
의존성 트리를 만드는 중입니다
상태 정보를 읽는 중입니다... 완료
The following additional packages will be installed:
transmission-cli
다음 새 패키지를 설치할 것입니다:
transmission-cli transmission-daemon
0개 업그레이드, 2개 새로 설치, 0개 제거 및 12개 업그레이드 안 함.
606 k바이트 아카이브를 받아야 합니다.
이 작업 후 3,104 k바이트의 디스크 공간을 더 사용하게 됩니다.
계속 하시겠습니까? [Y/n] y
2. 설정파일이 생성되도록 데몬을 한번 실행하고 중지한다.
jkpark@cactus:/storages/storage1/public/torrent$ sudo service transmission-daemon start
jkpark@cactus:/storages/storage1/public/torrent$ sudo service transmission-daemon stop
3. 설정
"cache-size-mb": 256,
캐쉬 사이즈를 높게 설정할수록 IO작업이 줄어든다. 너무 높게 설정하면 RAM에 부담이 되므로 적당히 설정하자.
"download-dir": "/storages/storage1/public/torrent/downloads",
다운로드할 위치
"download-queue-enabled": true,
"download-queue-size": 4,
한번에 몇개의 다운로드를 진행할 것인지
"incomplete-dir": "/sotrages/storage1/public/torrent/incomplete",
"incomplete-dir-enabled": false,
앞에서 말했듯이 토렌트용HDD가 고장나서 비활성화 한다.
"rpc-password": "비밀번호",
"rpc-username": "아이디",
"rpc-whitelist-enabled": false,
아무곳에서나 접속할 수 있게
"umask": 0,
디폴트는 18인데 삼바에서 파일 엑세스 시 오류나서 0으로 바꿈
기타 설정방법은 https://github.com/transmission/transmission/wiki/Editing-Configuration-Files 을 보고 참고한다.
*로그인 없이 접속하고 싶으면 "rpc-authentication-required"를 false
*로그인 없이 접속하고 싶으면 "rpc-authentication-required"를 false
4. 실행
jkpark@cactus:/etc/transmission-daemon$ sudo service transmission-daemon start
인터넷 브라우저에서 확인한다.

아이디/비밀번호 입력
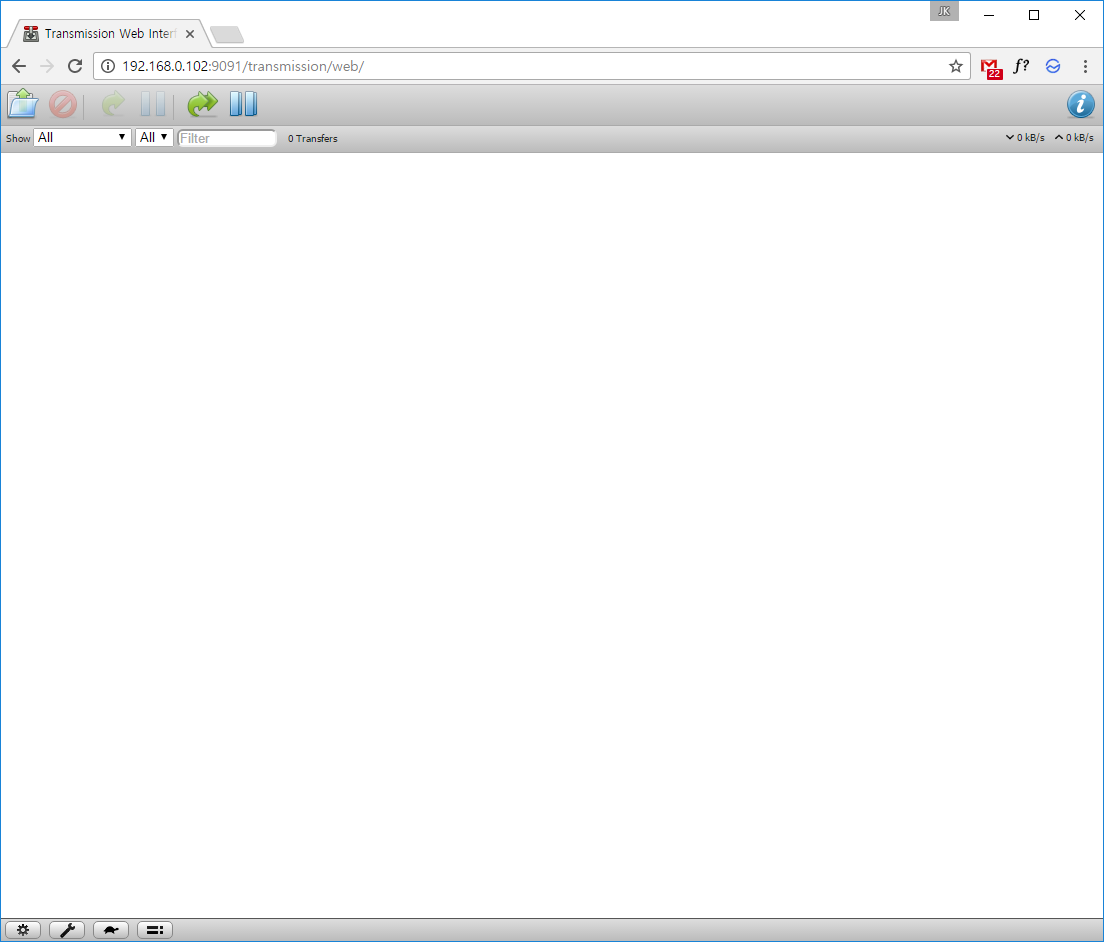
동작되는 것을 확인할 수 있다.
* 안드로이드용 앱도 있다.

Dec 28, 2016
hdd 마운트
1. HDD 인식되는지 확인
jkpark@cactus:~$ sudo fdisk -l
Disk /dev/sdb: 1.8 TiB, 2000365289472 bytes, 3906963456 sectors
Units: sectors of 1 * 512 = 512 bytes
Sector size (logical/physical): 512 bytes / 512 bytes
I/O size (minimum/optimal): 512 bytes / 512 bytes
Disklabel type: dos
Disk identifier: 0x00021365
Device Boot Start End Sectors Size Id Type
/dev/sdb1 4096 3906963455 3906959360 1.8T 83 Linux
새HDD의 경우 파티션설정과 포맷을 해야하지만,
이미 파일시스템이 있는 HDD를 인식한 것이기 때문에 파티션설정과 포맷은 생략한다.
2. 마운트할 UUID 확인
jkpark@cactus:~$ ls -l /dev/disk/by-uuid/
합계 0
lrwxrwxrwx 1 root root 10 12월 28 21:00 6defc19e-35d6-43a9-92c4-7240a90cc914 -> ../../sdb1
3. 마운트할 경로
jkpark@cactus:~$ sudo mkdir /storages
jkpark@cactus:~$ cd /storages/
jkpark@cactus:/storages$ sudo mkdir storage1
4. fstab 편집
jkpark@cactus:/storages$ sudo vi /etc/fstab
...
# /storages/storage1 was pm /dev/sdb1, jkpark mounted
UUID=6defc19e-35d6-43a9-92c4-7240a90cc914 /storages/storage1 ext4 defaults 0 1
5. 마운트 확인
jkpark@cactus:/storages$ sudo mount -a
jkpark@cactus:/storages$ ls storage1/
public
jkpark@cactus:/storages$
6. 권한변경
jkpark@cactus:/storages$ sudo chown jkpark:jkpark storage1/
jkpark@cactus:/storages$ ls -al
합계 12
drwxr-xr-x 3 root root 4096 12월 28 21:11 .
drwxr-xr-x 25 root root 4096 12월 28 21:10 ..
drwxr-xr-x 3 jkpark jkpark 4096 11월 16 16:35 storage1
jkpark@cactus:/storages$
7. 확인
jkpark@cactus:/storages$ df -h
Filesystem Size Used Avail Use% Mounted on
...
/dev/sdb1 1.8T 199G 1.6T 12% /storages/storage1
jkpark@cactus:/storages$
Nov 22, 2016
Rename Files In Android Studio
1. Select file + Shift + F6
2. Select file with right click + Refactor + Rename
Nov 16, 2016
Resilio (구버전: btsync, BitTorrent Sync) 를 이용한 안드로이드, 아이폰, 서버, 데스크탑 동기화
스마트폰에서 찍은 사진을 서버에 백업하고
다른 스마트폰과 공유하기 위해 동기화 프로그램이 필요하였다.
구글 드라이브같은 클라우드 서비스를 이용하면 간단하게 동기화를 할 수 있지만,
3자에게 정보를 공유해야하고 용량 제한, 업로드 속도 등 여러가지 제약이 많다.
Resilio Sync는 device to device 동기화이기 때문에 이번 기회에 사용해보고 싶었다.

다른 싱크프로그램도 많지만 아이폰, 안드로이드 뿐만 아니라 리눅스, 윈도우 모든 OS에서 동작하는 싱크프로그램이 필요하기 때문에 Resilio를 택했다.
또한 Resilio Sync는 bitTorrent Sync 의 새로운 버전이고 토렌트방식으로 동기화를 한다.
이 포스트를 통해 다음을 진행할 것이다.
1. Ubuntu16.04에 Resilio 설치
2. Windows 10 desktop 에 Resilio 설치
3. 우분투와 윈도우간의 동기화 테스트
4. 안드로이드폰에 Resilio 설치 및 동기화 테스트
5. 아이폰에 Resilio 설치, 테스트
Step 1: Ubuntu 16.04에 Resilio 설치
이 스텝은 https://help.getsync.com/hc/en-us/articles/206178924 의 가이드를 참고 하였다.
1. resilio-sync.list 파일 생성 및 내용 추가
jkpark@cactus:~$ sudo vi /etc/apt/sources.list.d/resilio-sync.list


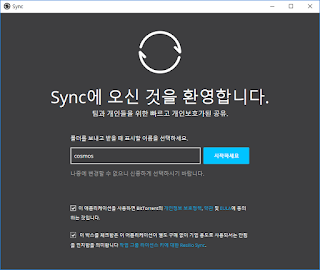

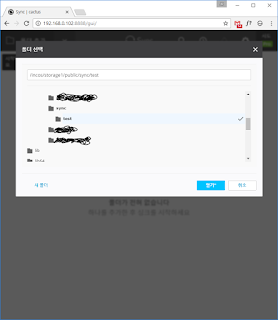


Step 4: 안드로이드폰에 Resilio 설치 및 동기화 테스트
테스트한 기종은 V20 입니다.
설치 후 테스트를 할 목적이었지만 방법이 어렵지 않기때문에
주목적이었던 사진 폴더 동기화를 바로 진행하였다.






Step 5: 아이폰에 Resilio 설치, 테스트
설치 방법 및 일반 폴더 동기화 방법은 안드로이드와 동일하다.
하지만 예상과는 달리 아이폰의 카메라 같은 경우 읽기모드만 지원하기때문에
서버에 백업은 했지만 서버에서 추가/수정/삭제가 불가능하다.
또한 동기화가 필요한 경우 어플을 실행해야하는 불편함이 있다.
다른 스마트폰과 공유하기 위해 동기화 프로그램이 필요하였다.
구글 드라이브같은 클라우드 서비스를 이용하면 간단하게 동기화를 할 수 있지만,
3자에게 정보를 공유해야하고 용량 제한, 업로드 속도 등 여러가지 제약이 많다.
Resilio Sync는 device to device 동기화이기 때문에 이번 기회에 사용해보고 싶었다.

다른 싱크프로그램도 많지만 아이폰, 안드로이드 뿐만 아니라 리눅스, 윈도우 모든 OS에서 동작하는 싱크프로그램이 필요하기 때문에 Resilio를 택했다.
또한 Resilio Sync는 bitTorrent Sync 의 새로운 버전이고 토렌트방식으로 동기화를 한다.
이 포스트를 통해 다음을 진행할 것이다.
1. Ubuntu16.04에 Resilio 설치
2. Windows 10 desktop 에 Resilio 설치
3. 우분투와 윈도우간의 동기화 테스트
4. 안드로이드폰에 Resilio 설치 및 동기화 테스트
5. 아이폰에 Resilio 설치, 테스트
Step 1: Ubuntu 16.04에 Resilio 설치
이 스텝은 https://help.getsync.com/hc/en-us/articles/206178924 의 가이드를 참고 하였다.
1. resilio-sync.list 파일 생성 및 내용 추가
jkpark@cactus:~$ sudo vi /etc/apt/sources.list.d/resilio-sync.list
아래 내용추가
deb http://linux-packages.resilio.com/resilio-sync/deb resilio-sync non-free
공개키 추가
jkpark@cactus:~$ wget -qO - https://linux-packages.resilio.com/resilio-sync/key.asc | sudo apt-key add -
OK
jkpark@cactus:~$
설치
jkpark@cactus:~$ sudo apt-get update
jkpark@cactus:~$ sudo apt-get install resilio-sync
설정
jkpark@cactus:~$ sudo systemctl enable resilio-sync
Synchronizing state of resilio-sync.service with SysV init with /lib/systemd/systemd-sysv-install...
Executing /lib/systemd/systemd-sysv-install enable resilio-sync
jkpark@cactus:~$ sudo vi /etc/resilio-sync/config.json

자신의 아이피로 설정
실행
jkpark@cactus:~$ sudo systemctl start resilio-sync
확인


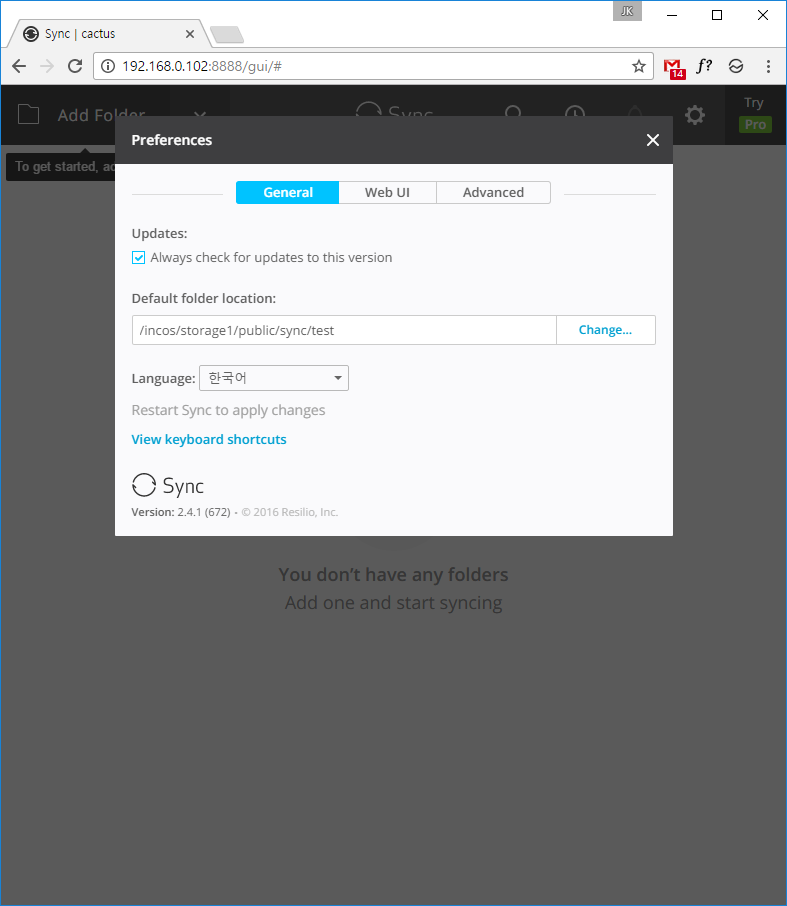
setting - preferences 에서 default folder location 과 언어를 변경
서비스 재시작
jkpark@cactus:~$ sudo systemctl restart resilio-sync
확인

Step 2: Windows 10에 Resilio 설치
https://www.resilio.com/individuals/ 페이지에서 free download 를 눌러 설치파일을 다운로드한다.
설치


Step 3: 동기화 테스트
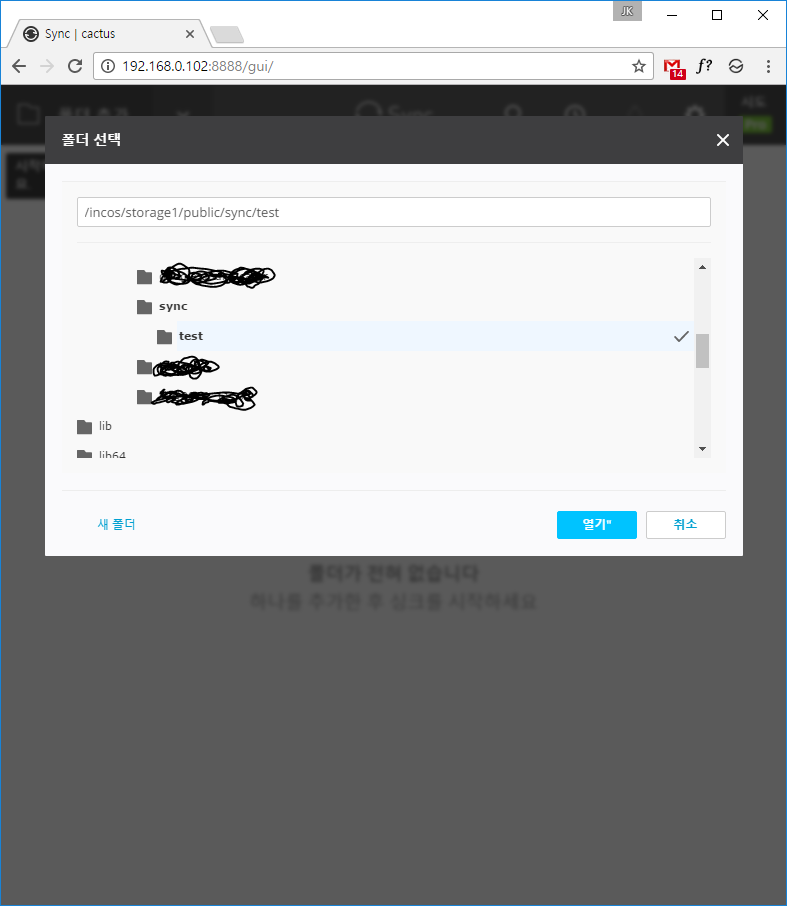
우분투에서 폴더 추가 버튼을 눌러 동기화할 폴더를 선택후 열기버튼 클릭

알맞게 설정 후 X버튼

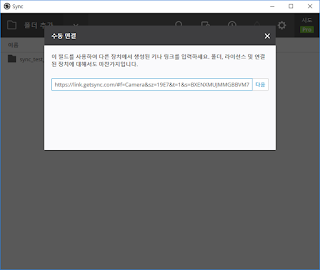
읽기 및 쓰기 키를 복사

윈도우에서 키 또는 링크를 입력 버튼 클릭

복사한 키 붙여넣고 다음 클릭
폴더 선택을 하면 다음과 같이 온라인 상태인 피어에 1of 1이라고 뜬다.
우분투와 윈도우가 동기화 상태가 되었다.
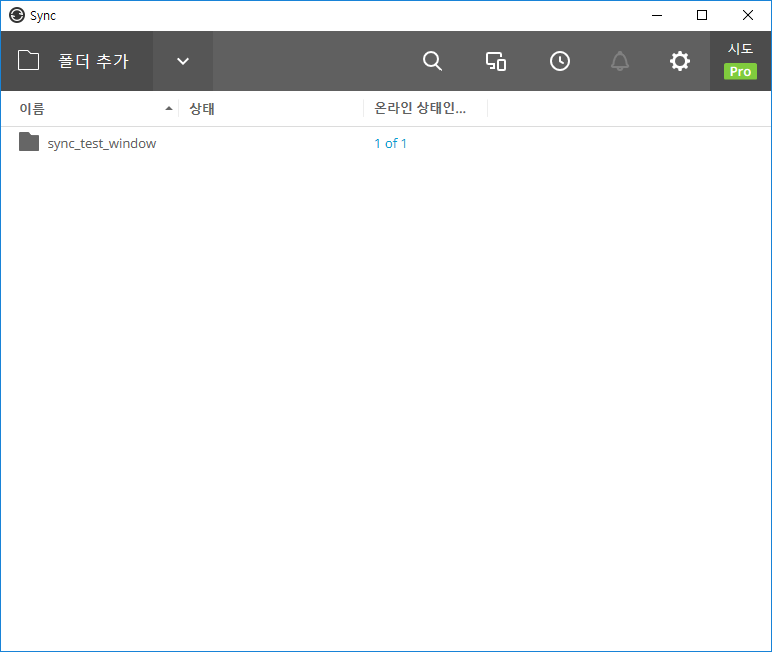
아무 파일이나 동기화폴더인 sync_test_window 에 넣어보니
우분투의 test 폴더에 파일이 생성되었다.
Step 4: 안드로이드폰에 Resilio 설치 및 동기화 테스트
테스트한 기종은 V20 입니다.
설치 후 테스트를 할 목적이었지만 방법이 어렵지 않기때문에
주목적이었던 사진 폴더 동기화를 바로 진행하였다.

설치

이름 설정

폴더 만들기 클릭

위치 지정 (카메라 기본 위치 선택함)

완료.
우측의 info 아이콘 클릭

권한 : 읽기 및 쓰기 (서버에서 삭제/추가 가능하도록)
링크 만료 : 절대 안함

선택적 동기화 해제 후 공유하기 클릭
(공유링크를 카카오톡으로 보냄)
윈도우로 돌아와서

폴더 추가 옆 + 버튼 클릭 - 키 또는 링크를 입력 클릭
공유 링크 붙여넣기

저장 위치 지정


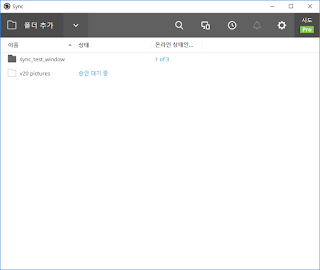
승인 대기 중...
스마트폰으로 돌아와서
우측상단에 알림아이콘 클릭

승인

승인이 완료되면 동기화를 시작한다.
우측하단 ↑11.4 MB/s 는 현재 업로드 속도를 표시한 것이다.
윈도우로 돌아와서
공유 지정 폴더를 보면 아래와 같이 사진이 동기화 되었다.

물론 쓰기 권한이 있기 때문에 추가/수정/삭제가 가능하고
동기화 폴더에 변화가 있으면 자동으로 스마트폰에서 동기화를 시작한다.
Step 5: 아이폰에 Resilio 설치, 테스트
설치 방법 및 일반 폴더 동기화 방법은 안드로이드와 동일하다.
하지만 예상과는 달리 아이폰의 카메라 같은 경우 읽기모드만 지원하기때문에
서버에 백업은 했지만 서버에서 추가/수정/삭제가 불가능하다.
또한 동기화가 필요한 경우 어플을 실행해야하는 불편함이 있다.
Nov 9, 2016
LEMP stack 에 WordPress 설치방법
Drupal 8 설치 후 테마, 모듈 수가 너무 적어서 Drupal 7을 설치하려고 했지만 WordPress를 설치하여 차이를 느껴보고 싶었다.
WordPress vs Joomla vs Drupal
설치 방법은
https://www.digitalocean.com/community/tutorials/how-to-install-wordpress-with-lemp-on-ubuntu-16-04 와
https://www.digitalocean.com/community/tutorials/how-to-install-wordpress-with-nginx-on-ubuntu-14-04 를 참고하였다.
설치 전 :
WordPress를 설치하기 전에 LEMP stack 이 설치되어있어야 하고, SSL가 활성화되어있어야 한다. 우분투 버전은 16.04 에서 진행하였다.
LEMP stack 설치 방법
Step1: WordPress를 위한 Database 생성 및 유저 생성
jkpark@cactus:/var/www/html$ mysql -u root -p
Enter password:
Welcome to the MariaDB monitor. Commands end with ; or \g.
Your MariaDB connection id is 1405
Server version: 10.0.27-MariaDB-0ubuntu0.16.04.1 Ubuntu 16.04
Copyright (c) 2000, 2016, Oracle, MariaDB Corporation Ab and others.
Type 'help;' or '\h' for help. Type '\c' to clear the current input statement.
MariaDB [(none)]> create database wordpress;
Query OK, 1 row affected (0.00 sec)
MariaDB [(none)]> grant all privileges on wordpress.* to wordpressuser@localhost identified by 'your_passsword';
Query OK, 0 rows affected (0.00 sec)
MariaDB [(none)]> flush privileges;
Query OK, 0 rows affected (0.00 sec)
MariaDB [(none)]> exit
Bye
jkpark@cactus:/var/www/html$
WordPress vs Joomla vs Drupal
설치 방법은
https://www.digitalocean.com/community/tutorials/how-to-install-wordpress-with-lemp-on-ubuntu-16-04 와
https://www.digitalocean.com/community/tutorials/how-to-install-wordpress-with-nginx-on-ubuntu-14-04 를 참고하였다.
설치 전 :
WordPress를 설치하기 전에 LEMP stack 이 설치되어있어야 하고, SSL가 활성화되어있어야 한다. 우분투 버전은 16.04 에서 진행하였다.
LEMP stack 설치 방법
Step1: WordPress를 위한 Database 생성 및 유저 생성
jkpark@cactus:/var/www/html$ mysql -u root -p
Enter password:
Welcome to the MariaDB monitor. Commands end with ; or \g.
Your MariaDB connection id is 1405
Server version: 10.0.27-MariaDB-0ubuntu0.16.04.1 Ubuntu 16.04
Copyright (c) 2000, 2016, Oracle, MariaDB Corporation Ab and others.
Type 'help;' or '\h' for help. Type '\c' to clear the current input statement.
MariaDB [(none)]> create database wordpress;
Query OK, 1 row affected (0.00 sec)
MariaDB [(none)]> grant all privileges on wordpress.* to wordpressuser@localhost identified by 'your_passsword';
Query OK, 0 rows affected (0.00 sec)
MariaDB [(none)]> flush privileges;
Query OK, 0 rows affected (0.00 sec)
MariaDB [(none)]> exit
Bye
jkpark@cactus:/var/www/html$
Step2: Nginx 설정
  4     root /var/www/html/wordpress;
  5     index index.html index.htm index.php;
  6     server_name 192.168.0.102;
  7     location / {
  8         index index.php;
  9         try_files $uri $uri/ /index.php$is_args$args;
 10 #try_files $uri $uri/ =404;
 11     }
테스트 & 재시작
jkpark@cactus:/var/www/html$ sudo nginx -t
nginx: the configuration file /etc/nginx/nginx.conf syntax is ok
nginx: configuration file /etc/nginx/nginx.conf test is successful
jkpark@cactus:/var/www/html$ sudo systemctl restart nginx
jkpark@cactus:/var/www/html$
Step3: WordPress 다운로드
jkpark@cactus:/tmp$ curl -O https://wordpress.org/latest.tar.gz
% Total % Received % Xferd Average Speed Time Time Time Current
Dload Upload Total Spent Left Speed
100 7774k 100 7774k 0 0 465k 0 0:00:16 0:00:16 --:--:-- 218k
jkpark@cactus:/tmp$
3. 아래 명령어로 group write permission을 부여하여 web interface 가 theme 와 plugin 변경 가능하도록 한다.
jkpark@cactus:/var/www/html/wordpress$ sudo chmod g+w wp-content
jkpark@cactus:/var/www/html/wordpress$ sudo chmod -R g+w wp-content/themes
jkpark@cactus:/var/www/html/wordpress$ sudo chmod -R g+w wp-content/plugins
jkpark@cactus:/var/www/html/wordpress$
jkpark@cactus:/var/www/html/wordpress$ ls -al wp-content/
합계 24
drwxrwsr-x 5 jkpark www-data 4096 11월 9 21:47 .
drwxr-sr-x 5 jkpark www-data 4096 11월 9 21:44 ..
-rw-r--r-- 1 jkpark www-data 28 1월 9 2012 index.php
drwxrwsr-x 3 jkpark www-data 4096 9월 7 23:59 plugins
drwxrwsr-x 5 jkpark www-data 4096 9월 7 23:59 themes
drwxrwsr-x 2 jkpark www-data 4096 11월 9 21:47 upgrade
jkpark@cactus:/var/www/html/wordpress$
WordPress main configuration 파일을 열었을 때 제일 먼저 해야할 일은 보안키를 설정하는 것이다. WordPress가 제공하는 secure generator를 이용하여 키 값을 만들 수 있다.
jkpark@cactus:/var/www/html/wordpress$ curl -s https://api.wordpress.org/secret-key/1.1/salt/
define('AUTH_KEY', '(@p -;LQVf1$wxO1 pt&이 글을 복사하지 마세요MhU6+9z2');
define('SECURE_AUTH_KEY', ')+SoyfkO!HX=vRC(fhb6이 글을 복사하지 마세요Bo&f]KmO');
define('LOGGED_IN_KEY', 'IFBwv/%~3Jwk?(rP,]1C이 글을 복사하지 마세요E ,b]u0V');
define('NONCE_KEY', '|fHfPA!U,Yh*F:HfZ9[r이 글을 복사하지 마세요eQ?=3>#B');
define('AUTH_SALT', '|:+NB@<h98|--t)a-dW/이 글을 복사하지 마세요cUx;)x/1');
define('SECURE_AUTH_SALT', 'ZVj.^eMKAtY:5+g:xhu1이 글을 복사하지 마세요T px,TY(');
define('LOGGED_IN_SALT', 'Uv5786a=D%R(~H.zWDJB이 글을 복사하지 마세요Q$XyRWsR');
define('NONCE_SALT', '$:!yP|#[i8w|FQSBP&&D이 글을 복사하지 마세요4A2=Zp>E');
jkpark@cactus:/var/www/html/wordpress$
생성된 키들을 WordPress 환경설정 파일에 복사한다.
jkpark@cactus:/var/www/html/wordpress$ vi wp-config.php


*: 업그레이드 방법
WordPress의 업그레이드가 가능할 경우 현재 권한으로는 업그레이드를 진행할 수 없다.
위에서 설정한 소유권과 권한으로 보안성이 높아져 소프트웨어가 스스로 update를 완료할 수는 없다.
따라서 업그레이드 시, 임시적으로 web server에게 소유권을 주어 업그레이드를 진행한다.
sudo chown -R www-data /var/www/html/wordpress
업그레이드 완료 시 다시 sudo user에게 소유권을 준다.
sudo chown -R jkpark /var/www/html/wordpress
jkpark@cactus:/tmp$ curl -O https://wordpress.org/latest.tar.gz
% Total % Received % Xferd Average Speed Time Time Time Current
Dload Upload Total Spent Left Speed
100 7774k 100 7774k 0 0 465k 0 0:00:16 0:00:16 --:--:-- 218k
jkpark@cactus:/tmp$
jkpark@cactus:/tmp$ tar xzvf latest.tar.gz
jkpark@cactus:/tmp$ cp wordpress/wp-config-sample.php wordpress/wp-config.php
wp-config-sample.php 샘플설정 파일의 대부분의 설정은 알맞게 되어있어므로 복사하여 기본 설정 파일로 만들어주었다.
jkpark@cactus:/tmp$ mkdir /tmp/wordpress/wp-content/upgrade
upgrade 디렉토리를 생성하고 WordPress를 업그레이드하면 upgrade 디렉토리안에 업그레이드에 필요한 파일들이 설치된다.
/tmp/wordpress 를 /var/www/html/wordpress 로 복사한다.
jkpark@cactus:/tmp/wordpress$ sudo cp -a /tmp/wordpress /var/www/html/wordpress
Step4: 소유권과 권한 설정
여기서 하는 작업은 타당한 접근 권한과 소유권을 설정하는 것이다. 일반유저가 파일을 쓸 수 있어야하고, web server가 파일과 디렉토리에 접근, 조작할 수 있어야한다.
1. 파일의 소유권은 sudo 유저로 한다.
jkpark@cactus:/var/www/html$ sudo chown -R jkpark:www-data /var/www/html/wordpress
[sudo] password for jkpark:
jkpark@cactus:/var/www/html$ ls -al
합계 24
drwxr-xr-x 4 www-data www-data 4096 11월 9 21:53 .
drwxr-xr-x 3 root root 4096 11월 9 14:24 ..
drwxr-xr-x 8 www-data www-data 4096 11월 2 18:08 drupal
-rwxr-xr-x 1 www-data www-data 612 11월 8 22:06 index.nginx-debian.html
-rwxr-xr-x 1 www-data www-data 20 11월 8 23:58 info.php
drwxr-xr-x 5 jkpark www-data 4096 11월 9 21:44 wordpress
jkpark@cactus:/var/www/html$
2. 각각의 디렉토리에 setgid 설정으로 새로 생성되는 파일들은 www-data 그룹을 상속받게 한다. 이 설정으로 web server가 생성된 파일들의 group ownership을 가지고 있게 한다.
jkpark@cactus:/var/www/html/wordpress$ sudo find . -type d -exec chmod g+s {} \;
jkpark@cactus:/var/www/html/wordpress$ ls -al
합계 196
drwxr-sr-x 5 jkpark www-data 4096 11월 9 21:44 .
drwxr-xr-x 4 www-data www-data 4096 11월 9 21:53 ..
-rw-r--r-- 1 jkpark www-data 418 9월 25 2013 index.php
-rw-r--r-- 1 jkpark www-data 19935 3월 6 2016 license.txt
-rw-r--r-- 1 jkpark www-data 7344 8월 17 05:39 readme.html
-rw-r--r-- 1 jkpark www-data 5456 5월 25 06:02 wp-activate.php
drwxr-sr-x 9 jkpark www-data 4096 9월 7 23:58 wp-admin
-rw-r--r-- 1 jkpark www-data 364 12월 19 2015 wp-blog-header.php
-rw-r--r-- 1 jkpark www-data 1477 5월 24 01:44 wp-comments-post.php
-rw-r--r-- 1 jkpark www-data 2853 12월 16 2015 wp-config-sample.php
-rw-r--r-- 1 jkpark www-data 2853 11월 9 21:44 wp-config.php
drwxr-sr-x 5 jkpark www-data 4096 11월 9 21:47 wp-content
-rw-r--r-- 1 jkpark www-data 3286 5월 25 2015 wp-cron.php
drwxr-sr-x 17 jkpark www-data 12288 9월 7 23:58 wp-includes
-rw-r--r-- 1 jkpark www-data 2382 5월 24 01:44 wp-links-opml.php
-rw-r--r-- 1 jkpark www-data 3353 4월 15 2016 wp-load.php
-rw-r--r-- 1 jkpark www-data 34057 6월 15 06:51 wp-login.php
-rw-r--r-- 1 jkpark www-data 7786 7월 13 21:37 wp-mail.php
-rw-r--r-- 1 jkpark www-data 13920 8월 14 01:02 wp-settings.php
-rw-r--r-- 1 jkpark www-data 29890 5월 25 05:44 wp-signup.php
-rw-r--r-- 1 jkpark www-data 4035 12월 1 2014 wp-trackback.php
-rw-r--r-- 1 jkpark www-data 3064 7월 6 21:40 xmlrpc.php
jkpark@cactus:/var/www/html/wordpress$
jkpark@cactus:/var/www/html/wordpress$ sudo chmod g+w wp-content
jkpark@cactus:/var/www/html/wordpress$ sudo chmod -R g+w wp-content/themes
jkpark@cactus:/var/www/html/wordpress$ sudo chmod -R g+w wp-content/plugins
jkpark@cactus:/var/www/html/wordpress$
jkpark@cactus:/var/www/html/wordpress$ ls -al wp-content/
합계 24
drwxrwsr-x 5 jkpark www-data 4096 11월 9 21:47 .
drwxr-sr-x 5 jkpark www-data 4096 11월 9 21:44 ..
-rw-r--r-- 1 jkpark www-data 28 1월 9 2012 index.php
drwxrwsr-x 3 jkpark www-data 4096 9월 7 23:59 plugins
drwxrwsr-x 5 jkpark www-data 4096 9월 7 23:59 themes
drwxrwsr-x 2 jkpark www-data 4096 11월 9 21:47 upgrade
jkpark@cactus:/var/www/html/wordpress$
Step 5: WordPress 환경설정
WordPress main configuration 파일을 열었을 때 제일 먼저 해야할 일은 보안키를 설정하는 것이다. WordPress가 제공하는 secure generator를 이용하여 키 값을 만들 수 있다.
jkpark@cactus:/var/www/html/wordpress$ curl -s https://api.wordpress.org/secret-key/1.1/salt/
define('AUTH_KEY', '(@p -;LQVf1$wxO1 pt&이 글을 복사하지 마세요MhU6+9z2');
define('SECURE_AUTH_KEY', ')+SoyfkO!HX=vRC(fhb6이 글을 복사하지 마세요Bo&f]KmO');
define('LOGGED_IN_KEY', 'IFBwv/%~3Jwk?(rP,]1C이 글을 복사하지 마세요E ,b]u0V');
define('NONCE_KEY', '|fHfPA!U,Yh*F:HfZ9[r이 글을 복사하지 마세요eQ?=3>#B');
define('AUTH_SALT', '|:+NB@<h98|--t)a-dW/이 글을 복사하지 마세요cUx;)x/1');
define('SECURE_AUTH_SALT', 'ZVj.^eMKAtY:5+g:xhu1이 글을 복사하지 마세요T px,TY(');
define('LOGGED_IN_SALT', 'Uv5786a=D%R(~H.zWDJB이 글을 복사하지 마세요Q$XyRWsR');
define('NONCE_SALT', '$:!yP|#[i8w|FQSBP&&D이 글을 복사하지 마세요4A2=Zp>E');
jkpark@cactus:/var/www/html/wordpress$
생성된 키들을 WordPress 환경설정 파일에 복사한다.
jkpark@cactus:/var/www/html/wordpress$ vi wp-config.php
아래 라인에 위에서 생성한 key들을 붙여넣는다.
49 define('AUTH_KEY', 'put your unique phrase here');
50 define('SECURE_AUTH_KEY', 'put your unique phrase here');
51 define('LOGGED_IN_KEY', 'put your unique phrase here');
52 define('NONCE_KEY', 'put your unique phrase here');
53 define('AUTH_SALT', 'put your unique phrase here');
54 define('SECURE_AUTH_SALT', 'put your unique phrase here');
55 define('LOGGED_IN_SALT', 'put your unique phrase here');
56 define('NONCE_SALT', 'put your unique phrase here');
Database 설정
23 define('DB_NAME', 'wordpress');
24
25 /** MySQL database username */
26 define('DB_USER', 'wordpressuser');
27
28 /** MySQL database password */
29 define('DB_PASSWORD', '비밀번호');
30
31 /** MySQL hostname */
32 define('DB_HOST', 'localhost');
33
34 /** Database Charset to use in creating database tables. */
35 define('DB_CHARSET', 'utf8');
36
37 /** The Database Collate type. Don't change this if in doubt. */
38 define('DB_COLLATE', '');
save and close the file
Step 6: Web Interface를 이용하여 설치를 완료한다.


*: 업그레이드 방법
WordPress의 업그레이드가 가능할 경우 현재 권한으로는 업그레이드를 진행할 수 없다.
위에서 설정한 소유권과 권한으로 보안성이 높아져 소프트웨어가 스스로 update를 완료할 수는 없다.
따라서 업그레이드 시, 임시적으로 web server에게 소유권을 주어 업그레이드를 진행한다.
sudo chown -R www-data /var/www/html/wordpress
업그레이드 완료 시 다시 sudo user에게 소유권을 준다.
sudo chown -R jkpark /var/www/html/wordpress
How to install Drupal 8.2.2
https://www.drupal.org/download 에서 최신버전의 바이너리를 확인
jkpark@cactus:/var/www/html$ sudo wget https://ftp.drupal.org/files/projects/drupal-8.2.2.zip
--2016-11-09 14:26:53-- https://ftp.drupal.org/files/projects/drupal-8.2.2.zip
Resolving ftp.drupal.org (ftp.drupal.org)... 151.101.76.68
접속 ftp.drupal.org (ftp.drupal.org)|151.101.76.68|:443... 접속됨.
HTTP request sent, awaiting response... 200 OK
Length: 21205013 (20M) [application/zip]
Saving to: ‘drupal-8.2.2.zip’
drupal-8.2.2.zip 100%[===========================================>] 20.22M 6.32MB/s in 3.7s
2016-11-09 14:26:58 (5.53 MB/s) - ‘drupal-8.2.2.zip’ saved [21205013/21205013]
jkpark@cactus:/var/www/html$ ls -al
합계 20728
drwxr-xr-x 2 www-data www-data 4096 11월 9 14:26 .
drwxr-xr-x 3 root root 4096 11월 9 14:24 ..
-rw-r--r-- 1 root root 21205013 11월 3 03:08 drupal-8.2.2.zip
-rwxr-xr-x 1 www-data www-data 612 11월 8 22:06 index.nginx-debian.html
-rwxr-xr-x 1 www-data www-data 20 11월 8 23:58 info.php
jkpark@cactus:/var/www/html$
테스트 & 재시작
jkpark@cactus:/etc/nginx/sites-available$ sudo nginx -t
nginx: the configuration file /etc/nginx/nginx.conf syntax is ok
nginx: configuration file /etc/nginx/nginx.conf test is successful
jkpark@cactus:/etc/nginx/sites-available$ sudo systemctl restart nginx
jkpark@cactus:/etc/nginx/sites-available$
설정


php gd모듈과 xml 모듈 설치
jkpark@cactus:/etc/nginx/sites-available$ sudo apt-get install php7.0-gd php7.0-xml
패키지 목록을 읽는 중입니다... 완료
의존성 트리를 만드는 중입니다
상태 정보를 읽는 중입니다... 완료
다음 새 패키지를 설치할 것입니다:
php7.0-gd php7.0-xml
0개 업그레이드, 2개 새로 설치, 0개 제거 및 2개 업그레이드 안 함.
139 k바이트 아카이브를 받아야 합니다.
이 작업 후 613 k바이트의 디스크 공간을 더 사용하게 됩니다.
받기:1 http://kr.archive.ubuntu.com/ubuntu xenial-updates/main amd64 php7.0-gd amd64 7.0.8-0ubuntu0.16.04.3 [27.1 kB]
받기:2 http://kr.archive.ubuntu.com/ubuntu xenial-updates/main amd64 php7.0-xml amd64 7.0.8-0ubuntu0.16.04.3 [112 kB]
내려받기 139 k바이트, 소요시간 0초 (583 k바이트/초)
Selecting previously unselected package php7.0-gd.
(데이터베이스 읽는중 ...현재 212758개의 파일과 디렉터리가 설치되어 있습니다.)
Preparing to unpack .../php7.0-gd_7.0.8-0ubuntu0.16.04.3_amd64.deb ...
Unpacking php7.0-gd (7.0.8-0ubuntu0.16.04.3) ...
Selecting previously unselected package php7.0-xml.
Preparing to unpack .../php7.0-xml_7.0.8-0ubuntu0.16.04.3_amd64.deb ...
Unpacking php7.0-xml (7.0.8-0ubuntu0.16.04.3) ...
Processing triggers for php7.0-fpm (7.0.8-0ubuntu0.16.04.3) ...
php7.0-gd (7.0.8-0ubuntu0.16.04.3) 설정하는 중입니다 ...
Creating config file /etc/php/7.0/mods-available/gd.ini with new version
php7.0-xml (7.0.8-0ubuntu0.16.04.3) 설정하는 중입니다 ...
Creating config file /etc/php/7.0/mods-available/dom.ini with new version
Creating config file /etc/php/7.0/mods-available/simplexml.ini with new version
Creating config file /etc/php/7.0/mods-available/wddx.ini with new version
Creating config file /etc/php/7.0/mods-available/xml.ini with new version
Creating config file /etc/php/7.0/mods-available/xmlreader.ini with new version
Creating config file /etc/php/7.0/mods-available/xmlwriter.ini with new version
Creating config file /etc/php/7.0/mods-available/xsl.ini with new version
Processing triggers for php7.0-fpm (7.0.8-0ubuntu0.16.04.3) ...
jkpark@cactus:/etc/nginx/sites-available$ sudo systemctl restart php7.0-fpm.service
jkpark@cactus:/etc/nginx/sites-available$


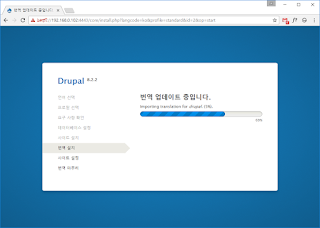


설치 완료.
jkpark@cactus:/var/www/html$ sudo wget https://ftp.drupal.org/files/projects/drupal-8.2.2.zip
--2016-11-09 14:26:53-- https://ftp.drupal.org/files/projects/drupal-8.2.2.zip
Resolving ftp.drupal.org (ftp.drupal.org)... 151.101.76.68
접속 ftp.drupal.org (ftp.drupal.org)|151.101.76.68|:443... 접속됨.
HTTP request sent, awaiting response... 200 OK
Length: 21205013 (20M) [application/zip]
Saving to: ‘drupal-8.2.2.zip’
drupal-8.2.2.zip 100%[===========================================>] 20.22M 6.32MB/s in 3.7s
2016-11-09 14:26:58 (5.53 MB/s) - ‘drupal-8.2.2.zip’ saved [21205013/21205013]
jkpark@cactus:/var/www/html$ ls -al
합계 20728
drwxr-xr-x 2 www-data www-data 4096 11월 9 14:26 .
drwxr-xr-x 3 root root 4096 11월 9 14:24 ..
-rw-r--r-- 1 root root 21205013 11월 3 03:08 drupal-8.2.2.zip
-rwxr-xr-x 1 www-data www-data 612 11월 8 22:06 index.nginx-debian.html
-rwxr-xr-x 1 www-data www-data 20 11월 8 23:58 info.php
jkpark@cactus:/var/www/html$
jkpark@cactus:/var/www/html$ sudo unzip drupal-8.2.2.zip
jkpark@cactus:/var/www/html$ sudo mv drupal-8.2.2 drupal
jkpark@cactus:/var/www/html$ ls -al
합계 20732
drwxr-xr-x 3 www-data www-data 4096 11월 9 14:28 .
drwxr-xr-x 3 root root 4096 11월 9 14:24 ..
drwxr-xr-x 8 root root 4096 11월 2 18:08 drupal
-rw-r--r-- 1 root root 21205013 11월 3 03:08 drupal-8.2.2.zip
-rwxr-xr-x 1 www-data www-data 612 11월 8 22:06 index.nginx-debian.html
-rwxr-xr-x 1 www-data www-data 20 11월 8 23:58 info.php
jkpark@cactus:/var/www/html$ sudo rm drupal-8.2.2.zip
jkpark@cactus:/var/www/html$
jkpark@cactus:/var/www/html$ sudo chown www-data: -R drupal
jkpark@cactus:/var/www/html$ ls -al
합계 20
drwxr-xr-x 3 www-data www-data 4096 11월 9 14:29 .
drwxr-xr-x 3 root root 4096 11월 9 14:24 ..
drwxr-xr-x 8 www-data www-data 4096 11월 2 18:08 drupal
-rwxr-xr-x 1 www-data www-data 612 11월 8 22:06 index.nginx-debian.html
-rwxr-xr-x 1 www-data www-data 20 11월 8 23:58 info.php
jkpark@cactus:/var/www/html$
데이터베이스 생성
jkpark@cactus:/var/www/html$ mysql -u root -p
Enter password:
Welcome to the MariaDB monitor. Commands end with ; or \g.
Your MariaDB connection id is 32
Server version: 10.0.27-MariaDB-0ubuntu0.16.04.1 Ubuntu 16.04
Copyright (c) 2000, 2016, Oracle, MariaDB Corporation Ab and others.
Type 'help;' or '\h' for help. Type '\c' to clear the current input statement.
MariaDB [(none)]> create database drupal;
Query OK, 1 row affected (0.00 sec)
MariaDB [(none)]> grant all privileges on drupal.* to drupaluser@localhost identified by 'your_password';
Query OK, 0 rows affected (0.01 sec)
MariaDB [(none)]> flush privileges;
Query OK, 0 rows affected (0.00 sec)
MariaDB [(none)]> exit
Bye
jkpark@cactus:/var/www/html$
확인
jkpark@cactus:/var/www/html$ mysql -u drupaluser -p
Enter password:
Welcome to the MariaDB monitor. Commands end with ; or \g.
Your MariaDB connection id is 34
Server version: 10.0.27-MariaDB-0ubuntu0.16.04.1 Ubuntu 16.04
Copyright (c) 2000, 2016, Oracle, MariaDB Corporation Ab and others.
Type 'help;' or '\h' for help. Type '\c' to clear the current input statement.
MariaDB [(none)]> exit
Bye
jkpark@cactus:/var/www/html$
drupal 접속을 위해 nginx default 설정파일을 수정한다.
jkpark@cactus:/etc/nginx/sites-available$ sudo vi default
  4     root /var/www/html/drupal;
  5     index index.html index.htm index.php;
  6     server_name 192.168.0.102;
  7     location / {
  8         index index.php;
  9         try_files $uri $uri/ /index.php$is_args$args;
 10 #try_files $uri $uri/ =404;
 11     }
테스트 & 재시작
jkpark@cactus:/etc/nginx/sites-available$ sudo nginx -t
nginx: the configuration file /etc/nginx/nginx.conf syntax is ok
nginx: configuration file /etc/nginx/nginx.conf test is successful
jkpark@cactus:/etc/nginx/sites-available$ sudo systemctl restart nginx
jkpark@cactus:/etc/nginx/sites-available$
설정


php gd모듈과 xml 모듈 설치
jkpark@cactus:/etc/nginx/sites-available$ sudo apt-get install php7.0-gd php7.0-xml
패키지 목록을 읽는 중입니다... 완료
의존성 트리를 만드는 중입니다
상태 정보를 읽는 중입니다... 완료
다음 새 패키지를 설치할 것입니다:
php7.0-gd php7.0-xml
0개 업그레이드, 2개 새로 설치, 0개 제거 및 2개 업그레이드 안 함.
139 k바이트 아카이브를 받아야 합니다.
이 작업 후 613 k바이트의 디스크 공간을 더 사용하게 됩니다.
받기:1 http://kr.archive.ubuntu.com/ubuntu xenial-updates/main amd64 php7.0-gd amd64 7.0.8-0ubuntu0.16.04.3 [27.1 kB]
받기:2 http://kr.archive.ubuntu.com/ubuntu xenial-updates/main amd64 php7.0-xml amd64 7.0.8-0ubuntu0.16.04.3 [112 kB]
내려받기 139 k바이트, 소요시간 0초 (583 k바이트/초)
Selecting previously unselected package php7.0-gd.
(데이터베이스 읽는중 ...현재 212758개의 파일과 디렉터리가 설치되어 있습니다.)
Preparing to unpack .../php7.0-gd_7.0.8-0ubuntu0.16.04.3_amd64.deb ...
Unpacking php7.0-gd (7.0.8-0ubuntu0.16.04.3) ...
Selecting previously unselected package php7.0-xml.
Preparing to unpack .../php7.0-xml_7.0.8-0ubuntu0.16.04.3_amd64.deb ...
Unpacking php7.0-xml (7.0.8-0ubuntu0.16.04.3) ...
Processing triggers for php7.0-fpm (7.0.8-0ubuntu0.16.04.3) ...
php7.0-gd (7.0.8-0ubuntu0.16.04.3) 설정하는 중입니다 ...
Creating config file /etc/php/7.0/mods-available/gd.ini with new version
php7.0-xml (7.0.8-0ubuntu0.16.04.3) 설정하는 중입니다 ...
Creating config file /etc/php/7.0/mods-available/dom.ini with new version
Creating config file /etc/php/7.0/mods-available/simplexml.ini with new version
Creating config file /etc/php/7.0/mods-available/wddx.ini with new version
Creating config file /etc/php/7.0/mods-available/xml.ini with new version
Creating config file /etc/php/7.0/mods-available/xmlreader.ini with new version
Creating config file /etc/php/7.0/mods-available/xmlwriter.ini with new version
Creating config file /etc/php/7.0/mods-available/xsl.ini with new version
Processing triggers for php7.0-fpm (7.0.8-0ubuntu0.16.04.3) ...
jkpark@cactus:/etc/nginx/sites-available$ sudo systemctl restart php7.0-fpm.service
jkpark@cactus:/etc/nginx/sites-available$


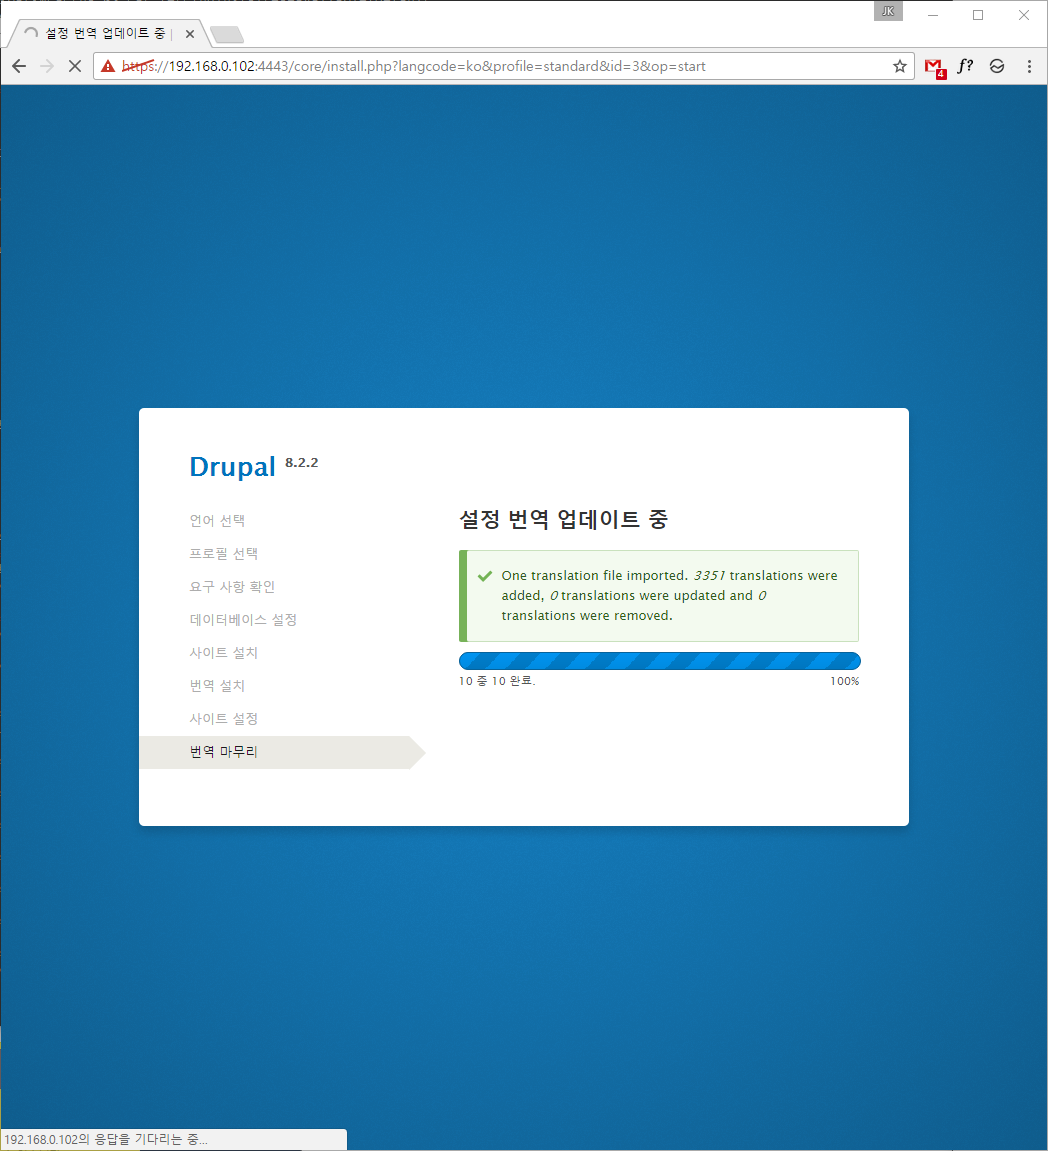

설치 완료.
Subscribe to:
Posts (Atom)